Transcript:
Hi, everyone. Welcome to today’s video segment where we’re going to review basic life support for the adult.
Before we even get to the rescue portion, step 1 is safety. Is it safe to go onto the scene and treat your victim? Unless you’re properly trained and properly equipped to go into a hazardous situation, don’t go. Step back. Call the appropriate authorities to make that scene safe. Remember, safety is paramount. Step 1 is your own safety.
Next, establish unresponsiveness. Give your victim a little shake, a sternal rub. Establish that they are unresponsive.
If they’re unresponsive, our very next step is to get help. You cannot work a full arrest by yourself. The literature cites a few different ways to do this. If you’re by yourself and there are people around, you can shout out for help, get someone’s attention. Have them call 9-1-1 and hopefully get an AED. If you’re by yourself and you have a cell phone, you can call 9-1-1, put it on speaker, start talking to the dispatcher while you go to work on the patient. Third, if you’re by yourself and there’s no one around and you don’t have a cell phone, you’re going to have to leave your victim. You’re going to have to go call 9-1-1 and hopefully grab an AED. As quickly as you can, come back to your victim. If there are two rescuers responding, two people there, one of them is going to go call 9-1-1, hopefully get an AED. The second rescuer is immediately going to go to work on the patient.
We have help coming. Our next step is to check for a pulse and breathing, simultaneously. First, the pulse check. Always start in the center of the neck, slowly working your fingers into the groove of the neck to palpate a carotid pulse. You should feel a firm, palpable carotid pulse. If you’re feeling and you’re going, “Geez, I don’t know if I feel a pulse. Tod, do you feel a pulse?” “Hmm, I’m not sure if I feel a pulse, what do you think?” “I’m not really sure. Let’s order a Doppler.” Stop it. You don’t have a pulse. Unless you feel a solid, palpable pulse, begin chest compressions. That’s not a pulse, begin chest compressions. While we’re checking for a pulse, we’re simultaneously looking at the chest to see is our victim breathing. Where we can get tripped up on this is if the patient presents with agonal breaths. This is ineffective breathing. It’s just sporadic, occasional gasps of air. They might be followed by sounds, kind of snoring sounds. It’s because the patient’s trying to breathe against a closed glottic opening. The tongue is most likely blocking the airway. This is not effective breathing. When you see that and you go, “Hey, his mouth moved. He’s breathing,” nah-ah, he’s not breathing. Anything other than sustained, rhythmic breathing with the chest coming up and down is not effective breathing. This pulse check and this check for breathing combined should take no more than 10 seconds. Feel for at least 5 seconds, look at the chest for at least 5 seconds, but no more than 10 seconds, in real life and you’re probably going to see it on a test in your immediate future.
Next, we need to start chest compressions. First, hand placement. You want the heel of your hand on the patient’s midline, center of the chest, just about the xiphoid process. This will place the heel of your hand on the lower third, lower half of the sternum. If your hand is too high up on the chest, you’re not going to get sufficient compression depth. The depth we’re aiming for is at least 2 inches but not to exceed 2.4 inches. That’s how far we’re going to compress the chest. We’re going to compress at a rate of 100 to 120 compressions per minute. This is straight out of the book, so when they’re looking for a rate, it’s 100 to 120 compressions per minute. What’s also important is the angle of your arms when you’re compressing the chest. It has to be straight down. If you’re at an angle at all, instead of the chest going up and down like this, it’s going to start moving side to side and you’re not going to get adequate compression depth. Make sure you’re positioned directly over the patient, straight down at least 2 inches, not to exceed 2.4 inches, at a rate of 100 to 120 per minute.
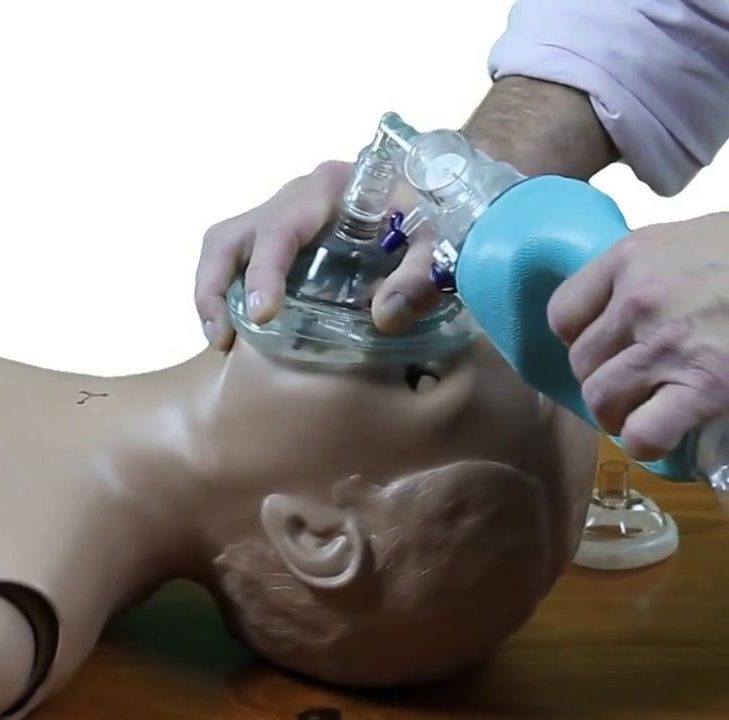
You’ve started chest compressions, now let’s talk about the ventilations. If you’re providing mouth-to-mask ventilations, you’re going to position yourself to the side of the patient and place the mask directly over the victim’s mouth and nose. You’re going to place one hand over the bridge of the nose. With the other hand, take the thumb, cover the bottom of the mask. With your fingers, grab just the bony part of the jaw and lift up, provide that head-tilt-chin lift. Then you can provide your two breaths. When you’re giving a breath, administering your breath, it should take you about 1 second to put that breath in. That’s the I-time (inspiratory time). How long it takes for you to actually put that breath in should be about 1 second. Let all the air come out. We should see the chest come back down. Provide another breath over 1 second and let that breath come all the way out. Our ratio of compressions to ventilations without an advanced airway is 30:2 (30 chest compressions, 2 breaths of air; 30 chest compressions, 2 breaths of air). Every 2 minutes, or about 5 cycles, we’re going to rotate out. We want someone fresh doing chest compressions on this patient throughout the arrest. So, 30 compressions, 2 breaths of air. If you’re providing ventilations with a bag valve mask, instead of being on the side of the patient, you’re going to position yourself at the head of the patient. Again, place the mask over the patient’s nose and mouth. You’re going to form your hands to make this C-E they call it (I just remember “okay airway” and open it up a little bit). I’m going to take my thumb and place it over the bridge of the nose, reaching around with my fingers, grabbing the bony prominence of the jaw and lifting up. That’s how I’m doing the head-tilt-chin lift. Then I can use my bag valve mask and provide positive pressure ventilation. Again, when we’re providing that breath, it should be over about 1 second and we’re watching for chest rise. If we suspect a cervical injury, we could do a modified jaw thrust. This is where the first rescuer is going to place his hands on the side of the victim’s head and move the jaw upward, maintaining a neutral C-spine. Don’t let that neck move, but you’re moving the jaw upward. A second rescuer will place the mask and provide the ventilations. Any time you’re doing a jaw thrust, it’s always a two-rescuer technique. Next, the pit crew technique. This is a relatively new technique that makes sense. If you look at a pit crew, everybody on that pit crew already knows their job, already has their assignment, and knows what they’re supposed to do. We can take that same model and apply it to rescuing a patient. This is more for professional rescuers. Everybody on this rescue team, on the pit crew, already knows what their assignment is. This way we can go to work on the patient faster and more effectively.
This has been a quick review of basic life support for the adult. I’m Mark. Thanks for watching. I’ll see you in the next video.
Recommended Articles

Basic Life Support & CPR for Children Video
Review the proper steps of CPR and basic life support for children in our quick BLS algorithm review video.


